
- Add Fill:
- Dig Footings:
- Install Plumbing & Electrical:
- Base Course:
- Vapor Barrier:
- Slab Reinforcement:
- Footing Reinforcement:
- When one length of rebar is not sufficient to cover the distance, it should be overlapped at least 18 inches, as shown in Figure 11.
- Rebar should never end at a corner. A bent piece of rebar, extending 18 inches in both directions should be used to form the corner, as shown in Figure 12.
- Rebar should be supported during the pour using rebar support chairs
, as shown in Figure 10b.
Clean, screened fill without any debris or organic matter is important to avoid having the ground underneath the slab settle. The fill should be tamped into position with a vibrating tamper and and the finished fill should be 8″ from the top of the forms.
As a general statement the footings should be a minimum of 12″ wide and should be in undisturbed soil a minimum of 6″. Footings should be at least 1' below the frost line. Check with your local building department for their minimum footing depth and size requirements.
If there is a requirement for drain and vent piping and electrical conduit, it should be installed at this time. Make sure all conduit, and piping is immediately capped to prevent, any debris, concrete, or gravel from entering the pipes.
Good building practices suggest that all pipes and conduits be laid in a bed of sand and covered with sand to avoid having the gravel or crushed stone base course, damage the material.
The base course consists of either crushed stone or gravel and should be a minimum of 4 inches thick. The base course helps to prevent moisture from forming water pools below the slab.
A vapor barrier, polyethylene sheet a minimum of 0.006″ thick should be placed on top of the base course to prevent moisture from permeating the slab from the soil. If necessary holes are cut in the polyethylene sheet to allow for plumbing pipes and electrical conduit.
The most common slab reinforcement is 6″ X 6″, 10 gauge wire mesh, that is pulled up to the lower third of the slab after it has been poured or is propped up using rocks, or fittings prior to the pour.
A relatively new method of reinforcement is to have fiberglass strands mixed into the concrete by the concrete supplier.
The footings should be reinforced with 3 or 4 metal rods known as rebar. Rebar comes in various sizes and grades. The most common rebar for house foundation construction is 5/8″ (#5), grade 40. The method of installing the rebar, so that it does its job of reinforcing the concrete so that it doesn't crack requires some basic knowledge.
Additional information on rebar
Rebar is usually sold in 20' lengths, and is cut using a power saw with a metal cut-off blade. Many building supply vendors will cut and/or bend the rebar to length and angle prior to delivery.
These are the key points when using rebar:

Figure 11 - Overlap rebar 18″ when joining two lengths together
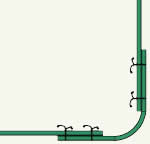
Figure 12 - Using rebar in a corner
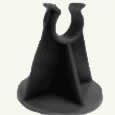
Figure 10b - Rebar support chair
Once the forms are in place, the plumbing and electrical is roughed-in, the base course and vapor barrier has been installed and the footings and slab have been reinforced you can start to pour the concrete. The size of the project will most likely determine whether you should have pre-mixed concrete delivered or make it on site.
Correctly pouring the concrete is critical to a project that will last with little or no problems. The concrete must be worked into the corners of the forms and around the metal mesh in the slab and rebar in the footings. Although concrete is heavy and will seek out its own level, it definitely will leave voids and honeycombs if it is not tamped into position and vibrated. it is also wise to use a hammer to tap on the exposed sides of the forms all around the perimeter of the forms.
The next step is to level the top of the concrete, with the top of the forms. This step is called screeding
and usually involves the use of a long, straight 2 X 4. The 2 X 4 is worked back and forth over the concrete in a saw like motion. This not only levels the concrete but starts the process of moving large pieces of aggregate below the surface of the concrete.
After the concrete is level with the forms the next step is to create a smooth surface.
- It is good practice to run a concrete edger, as shown in Figure 13, around the outside perimeter of the slab. The edger rounds the edge of the concrete and makes it less likely to chip, as a sharp edge will. Edging also increases the aesthetics of the slab.
- After the water sheen has left the surface of the concrete it is
floated
. Floating is used to remove the surface imperfections and to compact the surface. On smaller projects a concrete hand float, as shown in Figure 14, can be used. On larger projects a powered float or trowel, as shown in Figure 15, is normally used. Powered floats or trowels can be rented from most equipment rental facilities.

Figure 13 - Concrete edger
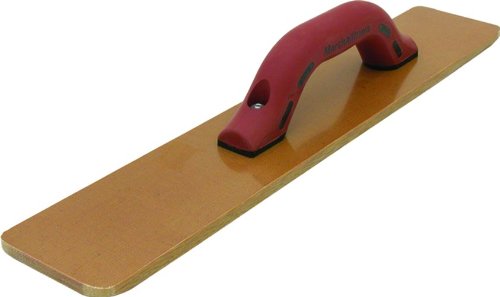
Figure 14 - Concrete hand float

Figure 15 - Powered concrete float or trowel
Once the concrete has been troweled it needs to cure. During the curing process it is important to keep the slab moist at all times.